2013年5月1日水曜日
Networking and Socket programming Tutorial on C
I have migrate my blog to new site. Click link below to redirect.
http://edisonthk.wordpress.com/2013/04/30/networking-and-socket-programming-tutorial-on-c/

2013年4月18日木曜日
2013年4月10日水曜日
Beginner Question - What is SSCCE?
For beginner programmer, you will found out this words comes out very often on java software developing forum such as stackOverflow. What does SSCCE mean?
If you have looks at the SSCCE link. 5 big words is highlighted on the top of the page.

And the following things is the content that filled with dozens of words to explain what does it means and why do we need to do it.
I know many programming beginner is short of patient and want their answer comes out immediately instead of reading a long long article to understand the content. SO,
What is SSCCE? It is
- Make your question as short as possible
- Make your question easy to be understand
- Post compilable code instead of parts of your work ( Simple code applying your problems. exp. public static void main )
Usually, people say “please post sscce”. It means post a runnable code that show the problems you are having and can be copy and paste and straight to be compiled on IDE (IDE means the software that used of developing application, exp. eclipse IDE, visual studio)
Why do we needs to do so?
No matter how well your English is, the best way to tell people what wrong on your code always is allow others compile you works and find the actual error.
For example,
Pretend that you are developing Java Swing application and you are having problems of label is not showing on windows. Here’s the code provided.
1: public class createLabel extends JLabel {2:3: public createLabel() {4: super();5: setText("HELLO WORLD");6: setLayout(null);7: }8:9: }10:
And the problems look like following.

Maybe you might think that label is not showing because there is an error on your label code so you only post the part of the label. However, you wouldn’t be able to solve it if you only post label code. Let’s me show you why. Take a look at following whole code.
1: import javax.swing.JFrame;2: import javax.swing.JLabel;3:4: public class createLabel extends JLabel {5:6: public static void main(String[] args) {7: JFrame frame = new JFrame("Title");8: JLabel label = new createLabel();9:10: frame.setDefaultCloseOperation(JFrame.EXIT_ON_CLOSE);11: frame.setLocation(300,200);12: frame.setSize(200, 130);13: frame.setVisible(true);14: }15:16: public createLabel() {17: super();18: setText("HELLO WORLD");19: setLayout(null);20: }21:22: }23:
If you tried to provide the compilable code instead of part of the code. We are able to help you find out what exactly you are having.
From the source above, we can understand that the reason why label is not showing on windows is due to frame.add(label) is not added. There is no problems on label code. So if you are provided a part of the code, you wouldn’t be able to found out what exactly problems you are having.
2013年4月1日月曜日
Square Root algorithm for C
Introduction
For those who are looking for how square root algorithm is working and “YES !, Welcome to my blog”, but for those who are simply looking for performing square root your programming and I have to tell you, what you have to do is do some google searching on “math.h” header file to look for square root function that prepared inside it.
Well, let’s begin our lesson “How square root algorithm is working on c”
It’s not very difficult once you have understand how following equation is calculated
 Left hand side of the diagram shows the square root of 152.2756 and right hand side shows the square root of 2.
For those who have understand how this calculation is been done, please skip to the code as I am going to explain the how to solve this equation.
Basic Principle of Square Root
Based on the question given above, we understand that square root of 152.2756 is 12.34 and the square root of 2 is 1.4142. If you do not believe, try calculator to find the answer.Suppose we are finding the square root of 2 and the answer is 1.4142. We can expressed it such that
![clip_image002[6]](https://blogger.googleusercontent.com/img/b/R29vZ2xl/AVvXsEiPljERvsGhWj2kiVUPzm4C1M0rcEU3GGkg-8AzSYa7BO_RSWnt-ZqUXC7NudECI4j9dCrAtSJTkYP3N0Hm0PgK8-GTjz4a87imSlZx_TLomrqrQlytpIctxzjDT2CcDdpZDMNMaMZbIlY/s1600-h/clip_image002%25255B6%25255D%25255B2%25255D.gif "clip_image002[6]")
![clip_image002[8]](https://blogger.googleusercontent.com/img/b/R29vZ2xl/AVvXsEhO1DJI0mV_jIKK1YmQa0sYyr87Z7LosMDFuohzEPtaqj6Mbx32inExHauCSaV2UfkZ9rbcpDfo7giTeMjD8z-1PTp9cLCa3l1JqcqedxyzPPAGoXKhdqasV5qgR4JRqyrviUGnd4tOZJk/s1600-h/clip_image002%25255B8%25255D%25255B2%25255D.gif "clip_image002[8]")
Suppose a is continue for n times, it can be expressed as following
 Why I am treating it continue as n times but not 5 times? Because we cannot ensure that all positive number will give us a 5 digits answer after square root it. So we have to suppose there are n digits after square root.
 Right-hand-side term can be expanded as following

From the equation above, we can understand square root equation can be solved by following equation.
 The most important rule of this equation is we pick a number from 1,2,3,4,5,6,7,8,9 and multiple it with 10^m, where m = Integer (exp. 3,2,1,0,-1,-2,-3,...) and substitute into
 ![clip_image002[12]](https://blogger.googleusercontent.com/img/b/R29vZ2xl/AVvXsEiobX65oFTIFNh4BS2NqeBm3oy143ABURl_n5nK8uWelygtJf_xLkSofGC3ch1wO72nUqG3h_aoZrodt09RRE8PwOjGeMqaoWmvoHwSqzpngu7KgRj36-5WMLL2Wj_PFzE_YiOBnuGtMpg/s1600-h/clip_image002%25255B12%25255D%25255B2%25255D.gif "clip_image002[12]") that must be smaller then the number we are going to minus or equal to it. It’s the most difficult part on square-root equation so lets understand it by solving square root of 2.
that must be smaller then the number we are going to minus or equal to it. It’s the most difficult part on square-root equation so lets understand it by solving square root of 2. 
So, from the solution above, we understand that

And we sum up all the value, we get the answer 1.414 approximate to 1.4142
Algorithm
Based on the method above, what kind of works should we applied on algorithm as following- Create equation
- Create function of power of ten
- Find suitable number that bigger then 0 for variable a from loop
- Find suitable number that smaller then 0 but positive for variable a from loop
- Sum all variable a and return it as double
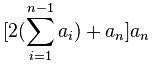
We can expressed it as code as following
(( 2 * rst ) + ( j * powerOfTen(i)))*( j * powerOfTen(i))
where rst and j is declared as double and i is int. powerOfTen is a function that return a value of i times multiple of 10.
It’s code of function powerOfTen
1:2: double powerOfTen(int num){3: double rst = 1.0;4: if(num >= 0){5: for(int i = 0; i < num ; i++){6: rst *= 10.0;7: }8: }else{9: for(int i = 0; i < (0 - num ); i++){10: rst *= 0.1;11: }12: }13:14: return rst;15: }
We have to judge that variable a must be smaller then upper number. It’s how it looks like
if(z - (( 2 * rst ) + ( j * powerOfTen(i)))*( j * powerOfTen(i)) >= 0)
where z is declared as double and treat as upper number.
There are two loops, one loop for finding the suitable number from 10000,1000,100,10… and another one loop for find suitable number from 1,2,3,4,5…
1: for(i = max ; i > 0 ; i--){2: // value must be bigger then 03: if(z - (( 2 * rst ) + ( j * powerOfTen(i)))*( j * powerOfTen(i)) >= 0)4: {5: while( z - (( 2 * rst ) + ( j * powerOfTen(i)))*( j * powerOfTen(i)) >= 0)6: {7: j++;8: if(j >= 10) break;9:10: }11: j--; //correct the extra value by minus one to j12: z -= (( 2 * rst ) + ( j * powerOfTen(i)))*( j * powerOfTen(i)); //find value of z13:14: rst += j * powerOfTen(i); // find sum of a15:16: j = 1.0;17:18:19: }20:21: }
Same loop as above but this times we are going to find the decimal number.
1: for(i = 0 ; i >= 0 - max ; i--){2: if(z - (( 2 * rst ) + ( j * powerOfTen(i)))*( j * powerOfTen(i)) >= 0)3: {4: while( z - (( 2 * rst ) + ( j * powerOfTen(i)))*( j * powerOfTen(i)) >= 0)5: {6: j++;7: if(j >= 10) break;8: }9: j--;10: z -= (( 2 * rst ) + ( j * powerOfTen(i)))*( j * powerOfTen(i)); //find value of z11:12: rst += j * powerOfTen(i); // find sum of a13: j = 1.0;14: }15: }
This is how the whole squareRoot algorithm looks like
1: double squareRoot(double a)2: {3: /*4: find more detail of this method on wiki methods_of_computing_square_roots5:6: *** Babylonian method cannot get exact zero but approximately value of the square_root7: */
8: double z = a;
9: double rst = 0.0;
10: int max = 8; // to define maximum digit
11: int i;
12: double j = 1.0;
13: for(i = max ; i > 0 ; i--){
14: // value must be bigger then 0
15: if(z - (( 2 * rst ) + ( j * powerOfTen(i)))*( j * powerOfTen(i)) >= 0)
16: {
17: while( z - (( 2 * rst ) + ( j * powerOfTen(i)))*( j * powerOfTen(i)) >= 0)
18: {
19: j++;
20: if(j >= 10) break;
21:
22: }
23: j--; //correct the extra value by minus one to j
24: z -= (( 2 * rst ) + ( j * powerOfTen(i)))*( j * powerOfTen(i)); //find value of z
25:
26: rst += j * powerOfTen(i); // find sum of a
27:
28: j = 1.0;
29:
30:
31: }
32:
33: }
34:
35: for(i = 0 ; i >= 0 - max ; i--){
36: if(z - (( 2 * rst ) + ( j * powerOfTen(i)))*( j * powerOfTen(i)) >= 0)
37: {
38: while( z - (( 2 * rst ) + ( j * powerOfTen(i)))*( j * powerOfTen(i)) >= 0)
39: {
40: j++;
41: if(j >= 10) break;
42: }
43: j--;
44: z -= (( 2 * rst ) + ( j * powerOfTen(i)))*( j * powerOfTen(i)); //find value of z
45:
46: rst += j * powerOfTen(i); // find sum of a
47: j = 1.0;
48: }
49: }
50: // find the number on each digit
51: return rst;
52: }
53:
Reference
I am referring to this wiki website. For more details, please refer on this website. Thank you.
2013年2月23日土曜日
Simple Sync Apps
About Download
Click here to download. The zip file contains 2 projects and 1 php file.
Introduction
I begin to learn programming is still half of a years ago and I begin to write this application is about one months ago. Begin from 0 knowledge to network and server. So I couldn’t make sure that I have wrote a very perfect program. But, this application do exactly what I need for that is synchronizing between android and desktop.It is how it’s look like. Check it out with the following video.

How it's work
 Picture above shows how the data is transferred. Database server is a bridge to allow data move from android to desktop and move from desktop to android. That’s all, simple right!
Of course that’s other way such as cloud computing or others. Based on my knowledge, this is easier way I know.
Develop Environment
My develop environment is Java JDK version 1.7.0_13, Eclipse SDK (Juno version 4.2.1), XAMPP 1.8.1, MySQL Connector/J 5.1.23, android 4.2Because every software I used to develop this application is open-source, I spent a zero cost on this project.
Program Flow Chart
 | Flow chart beside shows how data is passing through between android and desktop. When user press a button on UI thread to ask android read what desktop have written, android will begin access to MySQL server. In server side, 2 php files ( update database and read database php files) is created and located at htdocs. After android will success to access into server, then android will begin searching the php files requested (either update or read php files) through HTTP protocol. |
If the desktop ask for what android have written, it (desktop) will do exactly same things as what android did. desktop will going into database adapter request for data it wants. Then database adapter will log in to database server through Java-MySQL connector and search for what android have written into database. After database adapter get what their want, it will pass the data to desktop and desktop will put it on screen to show user what data it ( desktop ) got.
Source Code
- mysqlAndroid is an android project. Inside this project contains three java source code. (JsonParser, JsonPost and MainThread)
- JsonParser.java contains HttpGet method. There is no input data to url, only retrieve data from php file.
- JsonPost.java contains HttpPost method. This method allow data post into php file.
- MainThread.java is a UI thread work that called the button or textView method allow user talk with machine.
- mysqlDesktop is an java Swing project. Inside this project contains three java source code and one external jar that is DatabaseAdapter.java, jConnector.java and MainFrame.java and mysql-java Connector.
- jConnector.java contains the source code that allow java project connect to MySQL database.
- DatabaseAdapter.java used to make database work getting easier to carry out.
- MainFrame.java is a source code allow user to talk with device through window form
2013年1月3日木曜日
Simple notepad for android
I have migrate my blog to new blog. Click the link below to redirect.
http://edisonthk.wordpress.com/2013/01/02/simple-notepad-for-android/
http://edisonthk.wordpress.com/2013/01/02/simple-notepad-for-android/
2012年12月17日月曜日
How to create a simple list menu for android 4.2
I just started blogging on these days so I will be very appreciate if there is feedback comment on it.
My develop environment is jdk1.7 , android 4.2, and eclipse 4.2.1
This tutorial describe how to create a simple menu using default android layout and id .It is how is works. When you click on the list, toast will pop up on the screen. If it is difficult to image, figure below shows how it looks like.

1. Create listView layout
Following source code shows how the layout file looks like.<?xml version="1.0" encoding="utf-8"?> <LinearLayout xmlns:android="http://schemas.android.com/apk/res/android" android:layout_width="match_parent" android:layout_height="match_parent" android:orientation="vertical" > <ListView android:layout_width="match_parent" android:layout_height="wrap_content" > </ListView> </LinearLayout>
Create a new android application project and add the listView in to it. Note that don't miss any line written above. If you miss it, maybe there is error occur.
Now, you got the listView on your layout but you couldn't see anything as you don't have set any data on to it. So, what we are going to do next is to set data on to listView layout.
2. Set Array Adapter on to listView layout
Enter the following source code to your MainActivity class and extends ListActivity classNote that don't extends Activity class.
public class MainActivity extends ListActivity {

 @Override
 protected void onCreate(Bundle savedInstanceState) {
  super.onCreate(savedInstanceState);

  String[] values = new String[] { "Android", "iPhone", "WindowsMobile"};
  // First parameter - Context
  // Second parameter - Layout for the row
  // Third parameter - ID of the TextView to which the data is written
  // Forth - the Array of data

  ArrayAdapter<String> adapter = new ArrayAdapter<String>(this,
    android.R.layout.simple_list_item_1, android.R.id.text1, values);
  // Assign adapter to ListView
  setListAdapter(adapter);
 }
}
By extending ListActivity class, you are able to adapt the String[] to listView via setListAdapter() method.
Android platform provide defaults layout for rows. Code above use is one of example of defaults layout, android.R.layout.simple_list_item_1 contains default id android.R.id.text1. Of course you can create your own rows layout but on this tutorial, we are teaching how to create adapter by using Android defaults layout.
Now, you got "Android","iPhone","WindowsMobile" on your list. What we got to do next is to make the list function when we click on it.
3. Create onListItemClick
By adding following new method on to MainActivity class. When you click on the list item, toast will pop up.@Override public void onListItemClick(ListView l,View v,int position,long id){ String item = (String)getListAdapter().getItem(position); Toast.makeText(getApplicationContext(), item+"", Toast.LENGTH_SHORT) .show(); }
String item is to get the string what you clicked. Toast.makeText is to show what your get on String item.
4. Done !
Now, debug it and you will get what I said at the first.
Here's the complete MainActivity class look like.
import android.os.Bundle;
import android.app.ListActivity;
import android.view.View;
import android.widget.ArrayAdapter;
import android.widget.ListView;
import android.widget.Toast;

public class MainActivity extends ListActivity {

 @Override
 protected void onCreate(Bundle savedInstanceState) {
  super.onCreate(savedInstanceState);

  String[] values = new String[] { "Android", "iPhone", "WindowsMobile"};
  // First parameter - Context
  // Second parameter - Layout for the row
  // Third parameter - ID of the TextView to which the data is written
  // Forth - the Array of data

  ArrayAdapter<String> adapter = new ArrayAdapter<String>(this,
    android.R.layout.simple_list_item_1, android.R.id.text1, values);
  // Assign adapter to ListView
  setListAdapter(adapter);
 }

 @Override
 public void onListItemClick(ListView l,View v,int position,long id){
  String item = (String)getListAdapter().getItem(position);
  Toast.makeText(getApplicationContext(),
         item+"", Toast.LENGTH_SHORT)
         .show();

 }
}
登録:
投稿 (Atom)